DIY Painting Palattes: Apron Table
Hi everyone
This post is a DIY approach to a new kind of palatte for painting. As far as I know, no one has done one like this before. Ill show how I did it, you tell me if it works.
Here’s the problem: when you have a wet brush in your right hand, and a palatte balanced on your left arm, sometimes you need to squeeze more paint onto your palatte. But you dont have a free hand! You have to put down your brush, costing you painting time and breaking your flow.
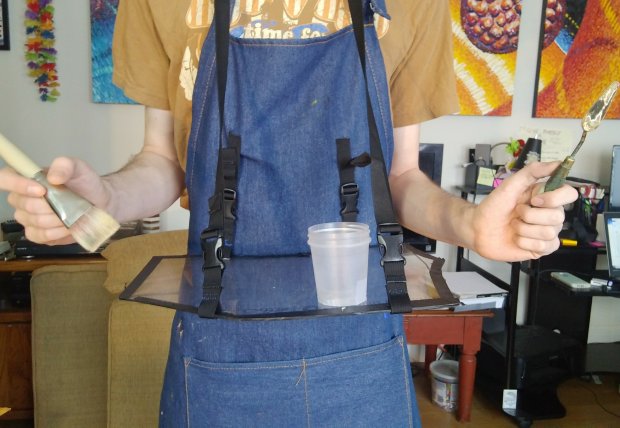
My solution: a palatte that is attached to the front of your body without you holding it. You can free up your left hand, letting you open and close paint tubes without putting your brush down.
Lets check out the process to make this pallate

I started out with a piece of clear acrylic. It was the leftovers from the Big Ol’ Bob Ross palatte. A fan suggested I use Lexan instead. If I did another I likely would. But I couldn’t find a piece of Lexan for free. The acrylic I found on the street, you cant beat that price. If you make one and buy materials, use Lexan instead of acrylic.
I cut out a rough shape with a curve where my belly goes. I didnt want the material to crack so I cut it as little as possible. It came out shaped kind of like Ohio. Works for me.
Surround the edge with painter’s tape if you want it to look cleaner.
Next you need buckles. I bought mine with my work discount (the theme today is saving money). They have 3/4 inch webbong attached. My Dremel tool made some holes in the pallate and I sewed the pieces in.
The next step is to attach two of the male sided buckles to your apron. Again, sewing is the most permanent way.
A note about sewing: sewing is easy, if it doesnt have to look perfect. Standard needle and thread will do the job here. Dont be intimidated by sewing or think it has to look perfect. I always mend clothing with bright thread so I can show people what I did.

The sewing isn’t very neat, but its not going to fall apart.
Next you need a sling that goes around your neck to hold the palate up. I used the one from my fanny pack because it has some padding. You could use any piece of webbing.
Last piece of the puzzle is a cup for solvents. I glued a magnet onto the bottom of a cup(I swiped a bunch of specimen cups long ago from a science lab). With that, its done.

When painting, I used it as a table surface, and also used the big palatte for mixing. It may sound unnecessary, but you really need a lot of space when you paint. You can also detach the palatte really easily for cleaning.
The downside of this setup is that it can spill things when you bend over. I dropped a brush once while working. One good thing is that sitting down isn’t a problem. It just sits in your lap.
The magnetic cup worked perfectly though. Magnets for the win.

I painted this copying Bob Ross from The Joy of Painting. His looked way better.
What do you think? I’m all up for suggestions. If you make one for yourself, show it off in the comments!
Happy painting everyone.
-Samwise


This is ingenious!
All I need is a catchy name and I’m in business!
Just needs a cup holder for a cool drink!
Or I could go all the way and get a hat with a straw that holds two beers!